
Monday 7 June 2010
Tuesday 25 May 2010

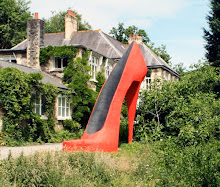
At last, the sculpture is delivered and installed on the flood plain at Broomhill. Sounds ominous!!
It all began on the morning of Monday 17 May when I collected the hired trailer and drove to the college. (I had spent the weekend before wrapping it up in a blanket and oldish carpets and a lot of rope.) The parcel was lifted onto the trailer and Barbara and I set off for Broomhill which turned out to be 3 hours away.
What an intriguing place! Sculptures everywhere you look. Rinus and Aniet made us very welcome with tea and biscuits before we set about installing the 300kg parcel. By evening it was bolted into place in its new home by a stream.

The stay over at the hotel was a lovely experience. We had a leisurely breakfast before we took a bucket and sponge to clean out the last of the leaves and cobwebs that had grown inside the sculpture over a couple of seasons. After coffee and cake (2 pieces each!) we wandered around the sculpture garden and then the gallery. (I already know which piece I want to take home with me!)

 Thanks Rinus and Aniet for your generosity. We are already planning our return visit with some appreciative friends.
Sunday 16 May 2010


The story continues:
Wednesday 23 April – Friday 24 April
Began bolting the slices together in pairs by laying one on top of the other and drilling through. Each bolt was then eased into position. This was problematic in that the access holes were not very clean so often the screw missed its destination and came out an a different place. In one instance the screw point came through the outside of the lower slice! I’m using large 32 mm washers which means that I loose sight of the screw point. On the other hand the washers are essential for spreading the load on the wood.
Once the slices are fixed as a pair I was able to use the belt sander to shape each outer surface to fit its neighbour. The sanding was going well until I realised that linseed oiling the surface meant that the sanding belt became clogged and greasy. This reduced its effectiveness sometimes down to zero. I resorted to cleaning the belts with a rag and white spirit but this was not that effective. I therefore struggled to shape the 6 or so slices that I had oiled over a period of 3 days!
Sunday 27 April
Made the decision to space each slice from its neighbour by inserting plywood “washers” between each pair. This would result in longitudinal stripes down the surface of the whole sculpture from each star point as well as allow the drainage of rainwater through the whole piece. (If the slices were fixed flush to each other, water would get in and not dry out.)
At the same time I realised that the access holes for each screw could potentially fill with rain water and that this would have to be dealt with or up to a quarter of a pint of water could sit in each hole. After some consideration I decided to make a circular cover for each access hole which could be panel pinned down once each screw had been inserted. These would be made out of marine plywood. These covers would also act as the spacers between each slice. If I put a smear of bathroom sealant on the underside of each disc and also paint it then this should stop rainwater getting in or rotting the wood. The covers could easily be levered up with a screwdriver to gain access to each screw on dismantling the sculpture.
Monday 28 April
Completed preparations for constructing the sculpture. Made a frame to support the structure as it is built. Decided to build not at an angle but with the model horizontal on the workshop floor.
Tuesday 29 April
Bolted all slices together to make the sculpture. Found it difficult to locate all the screws correctly. Often the screw hole was obscured and in a few instances the screw went out at the surface of the wood. Had to red-drill a few times. Have left all the screws in their holes ready to screw into place at the site.
Found that only 12 pieces were needed! Top piece would need to be narrowed to fit. Noticed one or two slices not screwed together securely.
Wednesday 30 April
Decided to half dismantle and tighten screws. The result was that the 12th slice did not need narrowing. Very fortunate! So we have a 12 pointed star after all. Clearly all the slices were at approximately 30 degree angles and not the 27degrees I had hoped for. I should have checked this angle at the beginning and saved myself the time in making the 13th slice!
Thursday 31 April
Dismantled the sculpture and sanded ready for painting.
Friday 1 May
Applied first coat of undercoat to each slice. Used Blakes marine grade undercoat and gloss. Just about dry enough by the end of the day to load into car and take home to continue the process over the bank holiday weekend.
Saturday 2 May
Applied second coat of undercoat in garage. Very difficult due to lack of space. Lots of moving around.
Sunday 3 May
Applied first coat of gloss – Blakes Pillar box red boat paint. OK above the waterline!
Monday 4 May
Applied second coat of gloss paint.
Tuesday 5 May
Carried all slices back to workshop 3 at a time in the car. Got all slices outside in the sun outside workshop to encourage the paint to harden up. Began sanding the outer surfaces with a belt sander and then the orbital finisher.
Wednesday 6 May
Continued in the sunshine to sand and prepare the surfaces.
Applied 3 coats of Varnol in succession, wet on wet.
Thursday 7 May
Fitted bracket to the base of the sculpture by taking slices 1/2 and 25/26, fixing them together then measuring up for the bracket. This turned out to be quite complicated because there was no flat surface or straight lines to work from. With John’s help I succeeded in fitting the base to the brackets with long bolts and nuts. Hopefully this will come together at the site but I cannot be sure!
Gave the outer surface two more coats of Varnol in quick succession. Finished off by wiping with a turps-soaked rag to get a “lovely mat sheen” as it said on the tin. All slices are now ready to transport to the site.
Friday 8 May
After the 2 hour lecture I took the ground spike to the site and began to knock it in with a sledge hammer. Needed help to keep it upright! Was concerned that the top plate might fracture under the hammer blows. Eventually got it to about 8 inches from its final position but was disappointed to see that it had tilted backwards.
Spent the rest of the day in the workshop loading the slices into the car with protective spacers. Paint still not hard enough for these not to stick together under their own weight. Cut the plugs to fill the final holes in the top slice which has to be screwed from the outside. Pity I need these as they will be very prominent on the top of the sculpture.
With the supportive frame on the roof rack and a kit of special tools the car was completely full and would now be left on the roadside until Sunday.
Saturday 9 May
In the middle of the night I decided the sloping ground spike would not do. I was concerned that the sculpture would appear to be tilted up too much. (When I had tried out the angle of tilt with the ply pattern earlier, the angle was quite important to the overall appearance of the thing.) Decided to dig the spike out and realign it.
After an hour’s work with spade and trowel I lifted the spike and whacked it in all over again. This time with more success. The tilt was in a sideways direction this time, which was acceptable.
Cut turf away to gain access to the bolt holes.
Sunday 10 May
Construction of the sculpture on site.
Started early and collected relevant tools. Quite difficult to think of all the necessary implements and expected to return home for some of these. Lucky I live so close to the campus.
Wheelbarrowed all the parts and tools from the parked car, down to the site and laid out the slices on protective polythene sheet. Barbara helped me lift the double, bracketed slice into place. Got the first bolt in but the holes for the second were mis-aligned. This was almost predictable so should have cut larger holes in one of the brackets to allow for this. Used a large round file that once belonged to my father to enlarge one of the holes in situ. Thanks dad.
Greased bolts and lock-nutted them into place. High security measure!
Began to build the sculpture as I had done in the workshop but immediately ran into difficulties when slice no. 3/4 did not match the first one. I always fall foul of sloppy numbering. The numbers get sanded off or painted over and I am not careful enough to replace them. Had to walk down to Tragos to buy a set of drill bits that would allow me to re-drill the screw holes.
Started to make progress by adding slices alternatively on either side. Got the wooden frame I had used in the workshop in place to support the weight of the structure as it grew. Barbara and her mum came to offer support and sat on the grass for about 2 hours watching. Barbara helped me manoevre some of the last pieces into place. These were in danger of falling off before they were fixed.
Tea and cucumber sandwiches in the lovely setting of the garden. Real feeling of responsibility for not spoiling the beauty and tranquillity of this place.
There were problems that I had expected when it came to fitting the last piece. The two sides of the sculpture had come together with a slight twist despite all the efforts to align things carefully. I had to return after Sunday dinner at 6.30 pm to resolve the situation. With a combination of large luggage strap on the outside and thick wooden wedges on the inside I managed to align the last piece reasonably well. (It will never be perfect.) Finished off by using external screws at 45 degrees and then plugging the holes with the plugs I had already cut. These were all left proud while the glue set. Finished at 8.00pm.
Monday 11 May
Friends came to help “launch” the sculpture with a picnic and a bottle of wine. I’m very happy with the outcome. It’s as good if not better than I had imagined. The natural setting really makes a difference.
Tuesday 12 MayReturned to plane off the protruding plugs and excess glue and to give the top slice an extra coat of Varnol. Took lots of photographs in the sunshine.
Friday 14 May 2010

Only just worked out how to upload pictures. How sad is that????
This is a balsa wood maquette made in the early stages. Its only about 10 cm in diameter.
This one I made even earlier was cast in plaster then carved.

Decision made, I began to collect m aterials for the big one.
And set to work to shape each piece.

Each segment was cut on a big band sa w
w
After the shaping and drilling, the painting and treatment.
Monday 24 March
Ordered wood from Truro Sawmills who said it might take 2 weeks! Sitka Spruce seems to be the cheapest. (It’s what the earlier “gill sculpture” was made of.) They are able to cut the rectangular section wood pieces on a diagonal along the length to give me the wedge shape that I need.
Friday 28 March
Was able to collect wood! Much greater volume that I had anticipated. I could just lift each wedge which resembled a railway sleeper! There are 26 pieces. Took two car loads on a one and a half hour round journey. (Car has been creaking ever since.) Loaded wood into my small and now crowded garage and numbered each piece 1 to 26. Began marking out. Tried cutting down the length of a piece with my hand saw. Made no impression after 15 minutes! Wondered about buying a bow saw, a reciprocating saw or hiring a chainsaw.
No-one can hire me a chainsaw, but discover I can borrow one from Ian at the museum.
Monday 7 April
Begin making cuts with Ian’s chainsaw. Find it will do the job but slowly. Decide to buy my own chainsaw and find that with a new blade it cuts the wood (almost) like butter. Very pleased! Make good progress.
8-11 April
Work solidly to shape all 26 wood pieces using chainsaw and hand held electric planer. Mark out each piece of wood while it is on the bench. (Hard work moving each piece so need to do this as little as possible.)
Placed two pieces of plywood against the garage door and marked out the full size of the sculpture. Made a decision to make an egg shape rather that complete sphere and drew this on the ply. An egg shape will allow the star points to come down around the body of the sculpture more. Cut a pattern from one side of the ply and screwed guides to it so that it rested in the same place on each piece of wood.
Needed to make a prop to hold each wedge up a bit on the bandsaw table so that the cut was at right angles to the centre line of the end of the wedge. This would be screwed to each wedge prior to cutting.
Had a conversation about treating the wood with Mike. He suggested a boatbuilder’s oil called Varnol which can be applied in just one day.
Saturday 12 April
Loaded most pieces into the car and drove to Museum workshop at Ponsharden where I was able to borrow the large bandsaw. Managed to cut out 17 of the 26 curved pieces in 3 hours. Quite a lot of “waste” wood off-cuts. These could make a different sculpture one day so they will be saved. I could have ordered wood in a different shape in order to avoid this waste and indeed tried to work this out but it didn’t look feasible. If I did this again I would find a way of having less waste – hence less cost.
Had a conversation with Richard a master wood carver, about the shrinking of the wet wood over time. The problem is how to avoid the wood splitting up as a result of being held in position too rigidly. Have an idea about how to use the screw bolts so that this can happen.
The wood is in the back of the car now – too tired to unload it!
Sunday 13 April
Completed the cutting of the curves on the band saw. Another two hours of work. Unfortunately I cut part the way through a screw and blunted the blade. The blade got hot and welded itself to the rubber on the two drive wheels! Half an hour for Mike to sort this out!
Had to store all the off-cuts in the garage. They take up a lot of space.
Very satisfied with the weekend’s progress.
Tuesday 15 April
Went to see Henry (Estates) to let him know how I’m progressing. I don’t want to suddenly spring this thing on people so the more who know about it the better as it progresses. Henry showed me where the water and other mains pipes are under the lawn so I don’t dig them up.
Transferred all the wood pieces to the workshop in the Marine school. Again, slightly embarrassed by the size of it all and the amount if solid wood it is consuming. Was there a more economical way to do this? Had a chat with Jane who was supportive too. Feeling better about it all.
Started to glue the pairs together. Found they became quite heavy like this but just manageable. I think I need the glue to fix down the feather-edge on the top piece so worth doing. Found it best to “clamp the pieces together by screwing them, though did use G cramps to secure ends. Started to consider which bolts to use and think I will go for weatherproof coach screws from Screwfix at a total cost of about 28 pounds!
Wednesday 16 April
Spent the day in the workshop gluing the remaining pairs together. The gap filling Balcontan glue seems to be working well.
Started to drill holes for the joining bolts. This requires a large 32mm access hole followed by a 10mm hole for the shaft of the bolt then a 6 mm pilot hole. All these need to be drilled in the right direction so I will use a very long drill bit as a direction finder. I need an extension for the 32mm spade bit in order to reach the required depth. I’m working on intuition as regards the method of bolting the sections together. Five 5 inch bolts joining each section should do it??????
Also started thinking about the support posts and the angle at which these might be. Have left sections 25 and 26 unglued so that I can cut these for the posts more easily. I have also left the last section at the top unglued because this will almost certainly need trimming so that it fits in.
Thought a bit more about how this thing will go together on site:
Knock metal post holders in as a foursome.
Knock already shaped wooden posts in and bolt together laterally.
Bolt number 1 / 2 section to the posts on the side.
Bolt number 25 / 26 pieces to number 1 / 2 and the posts
Bolt number 23 / 24 section to posts
Sections may need support at the front as they are added
Sculpture will be at its most vulnerable to collapse when half the bottom has been completed. The half finished construction will almost certainly need support until the last (keystone) piece is put in.
Thursday 17 April
Continued to drill holes for bolts. Realised that the orientation between each slice (the angle at which they are bolted together) is critical. If each slice is not parallel to its neighbour then the top piece will not join the whole together! Talked to John about this and decided to build a semicircular former on which to construct a number of slices at once. This would ensure the slices follow a circular core of 14 inches and remain parallel.
Discussed with John various methods for fixing the sculpture to the ground. Including the 4 fence post idea as well as using a metal plate bolted to the bottom of the sphere. Lots of sketches made.
Friday 18 April
Spent the rest of the day drilling holes for the bolts. Time consuming and labour intensive work. Discovered after drilling 4 slices that there is a more accurate way of doing this by drilling from the face from which the bolts emerge.
Have to be very careful that the access holes for the slices are drilled from the correct side so that sculpture can be assembled correctly on site. Made a drawing to aid this process.
Find that I am becoming strongly in favour of a metal plate bolted to the bottom of the structure and then bolted to a plate anchored in the ground. This would avoid cutting a large piece out of the structure to accommodate the fence post. It means the sculpture could change its tilt in the future by merely moving the position of the plate. Hope John can make a strong enough plate and ground spike. Will make drawing for him next week.
Notice the wood is beginning the crack at it dries in the warm workshop atmosphere. Will have to linseed oil all pieces first thing next week to slow this down.
Tuesday 22 April
Considering the wooden fence post method of fixing the sculpture to the ground because I can control all of this. Post spikes and fence post will cost about 30 pounds.
Spent a full day in the workshop. Completed all the screw holes – 65 of them drilled with 4 separate drills. Linseed oiled about 5 of the slices before the litre ran out. Began belt sanding each slice ready to fit these together.
Fitting together involves matching each slice on its outer edge, ensuring the straight edges are parallel then drilling the pilot holes for the coach screws. Only then can I plane and sand each outer slice to match its neighbour. Can only do half of the sphere at a time on the table top. See the sketchbook for how I’m going to do this.
Decided I should use the largest washers possible so that the bolt head does not destroy the wood inside the access hole.
Talked to John about the method for fixing the sculpture to the ground again. Considering a fabricated metal plate again. John can do the welding if I can source the metal.
Wednesday 14 April 2010
The story continues:
Friday
Cast a cylinder of plaster of Paris with a star “hole” through the middle made with wooden pieces with Vaseline on. Carved this immediately into an approximate sphere so that the star points curved around the top and bottom.
This was the fourth maquette carved in plaster and was the most pleasing with potential form for the final sculpture. It was difficult to shape and smooth the interior star shape and the exterior was only roughly shaped with a surform plane by the end of the day. It was enough, however, to point towards a possible solution.
Tuesday
Made a balsa wood maquette similar to the plaster one mentioned above. This time I made a 13 point star to explore the effects of more points. I bought balsa wood sections which are normally used for the trailing edges of model aircraft – these are cut at a10 degree angle. With enough of them glued together I could make a sphere with a hole in the centre and eventually a star shape. This method of construction would mirror that which I would use with a full size sculpture.
I like this maquette and will choose it as the basis for the full size sculpture. At the moment I have in mind a much more spherical shape than the maquette but I do like the irregular lengths of the star points.
Friday
Cut a full size circle out of corrugated card to get an idea of the scale.
Thought the 4 ft diameter looked large enough but this will be expensive on materials. The 3 ft diameter would look ok in the right setting - perhaps among the shrubs and trees. The larger diameter could probably stand out on its own.
Decided to go for a 3.5 ft diameter. Made half size plan drawing and drew up a cutting list. Decided to go for 4 ft height of each plank giving me the possibility of cutting an egg shape rather than a sphere.
Friday
Cast a cylinder of plaster of Paris with a star “hole” through the middle made with wooden pieces with Vaseline on. Carved this immediately into an approximate sphere so that the star points curved around the top and bottom.
This was the fourth maquette carved in plaster and was the most pleasing with potential form for the final sculpture. It was difficult to shape and smooth the interior star shape and the exterior was only roughly shaped with a surform plane by the end of the day. It was enough, however, to point towards a possible solution.
Tuesday
Made a balsa wood maquette similar to the plaster one mentioned above. This time I made a 13 point star to explore the effects of more points. I bought balsa wood sections which are normally used for the trailing edges of model aircraft – these are cut at a10 degree angle. With enough of them glued together I could make a sphere with a hole in the centre and eventually a star shape. This method of construction would mirror that which I would use with a full size sculpture.
I like this maquette and will choose it as the basis for the full size sculpture. At the moment I have in mind a much more spherical shape than the maquette but I do like the irregular lengths of the star points.
Friday
Cut a full size circle out of corrugated card to get an idea of the scale.
Thought the 4 ft diameter looked large enough but this will be expensive on materials. The 3 ft diameter would look ok in the right setting - perhaps among the shrubs and trees. The larger diameter could probably stand out on its own.
Decided to go for a 3.5 ft diameter. Made half size plan drawing and drew up a cutting list. Decided to go for 4 ft height of each plank giving me the possibility of cutting an egg shape rather than a sphere.
Subscribe to:
Posts (Atom)

